
Support Documents
- Manufacturer’s Warranty
- Safety Procedures
- Servicing
- Torquing- Wheel Lugs & Suspension
- Lubricants
- Tire Wear
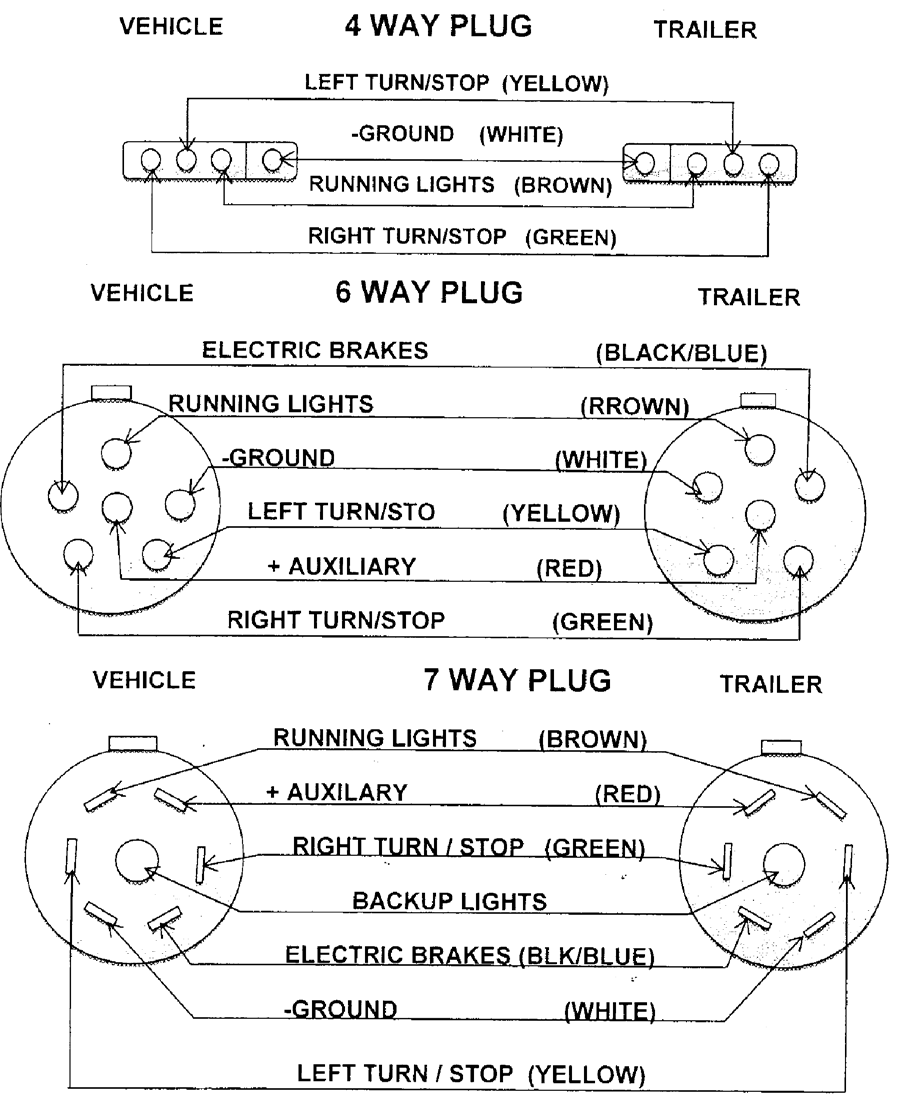
- Plug Wire Diagram
- Brake Adjustment
- Hydraulic Brake Bleeding
MANUFACTURER’S WARRANTY
- Buck Dandy Co., Inc. Warrants its’ Product to be Free of Defects for a Period of One (1) year from the Date of the Original Purchase.
- Warranty Covers – Defects in Materials, Frame and Workmanship. Frame Includes – Main Frame, Side Rails, Cross members, and Sub Frame only.
Warranty Limitations and Exclusions
- Components Not Manufactured by Buck Dandy Co., Inc. such
as – Axles, Brake Parts, Suspensions, Tires, Wheels, Couplers, Jacks, Etc., Are Warranted by Their Original Manufacturer, but Not Limited Exclusively to These Items. - Normal Wear – Items Not Warranted Due to Wear Include- Brakes, Bearings, Seals, Tires, Hoses, Paint Due to Chipping and Scarring, Lumber Due to Fading or Shrinking, or Parts due to Corrosion Etc., but Not limited Exclusively to These Items. These Items are Not Warranted.
- Modifications or Alterations Voids Manufacturer’s Warranty.
- Any Damage Caused by Overloading, Modifications, Alterations, Negligence, Accidents, Improper Loading, Misuse or Abuse such as- Bent Frames, Bent axles, Punched Tires, Bent/Damaged Hitch, Other Property; but Not Limited Exclusively to These Items, Is Not Covered Under Warranty.
- Damage Done Due to Lack of Proper Maintenance, Service and Safety Checks, Such as- Incorrect Air Pressure, Checking/Tightening Lug Nuts, Unfastened/Unsecured Couplers, Latches & Pins, Etc., is Not Covered Under Warranty.
- Transportation Cost of Trailer to Dealer or Repair Shop, Towing, Storage, Rental, Economic Loss, Loss of Time or Inconvenience, Etc. is Not Covered Under Warranty.
DISCLAIMERS
This Warranty is expressly in lieu of all other warranties and representations. Buck Dandy Co., Inc. makes no other representation or warranty of any kind, expressed or implied, with respect to Buck Dandy Co., Inc. No one, including an authorized Buck Dandy Co., Inc. representative is authorized to make further or additional warranties on behalf of Buck Dandy Co., Inc.
Warranty Claim Procedure
1. All Claims Must First be Handled Through the Dealer of Purchase.
2. Trailer Will Need to be Returned to Dealer (if at all Possible) for Inspection and Pictures as Soon as Possible.
3. Dealer May Submit Warranty Claim if Applicable.
4. All Warranties Must Be Pre-Notified and Agreed with Manufacturer.
TRAILER SAFETY PROCEDURES Before Towing – Every Use
- Check Hitch/Ball on Vehicle for Correct Size, Rating and Damage.
- Make Sure Hitch/Ball is Secure.
- Check Lubrication on Hitch/Ball.
- Inspect Coupler/Pintle for Damage, Cracks & Wear.
- Latch & Secure Coupler/Pintle.
- Check Master Cylinder/Actuator (Hydraulic Brakes) forLeaks & Damage. (If Applicable)
- Latch & Secure Safety Chains to Vehicle.
- Retract Jack(s).
- Secure All Bolts, Nuts, Latches and Pins: Coupler Pins/Bolts & Nuts, Ramp Pins, Gate Latches/Pins, Gate Bolts/Nuts, Tilt Pins, Etc.
- Check Signal, Brake and Running Lights.
- Check Lug Nuts. (See Torque Chart and Sequence)
- Check Air Pressure in Tires (PSI- located on Labels and Tires)
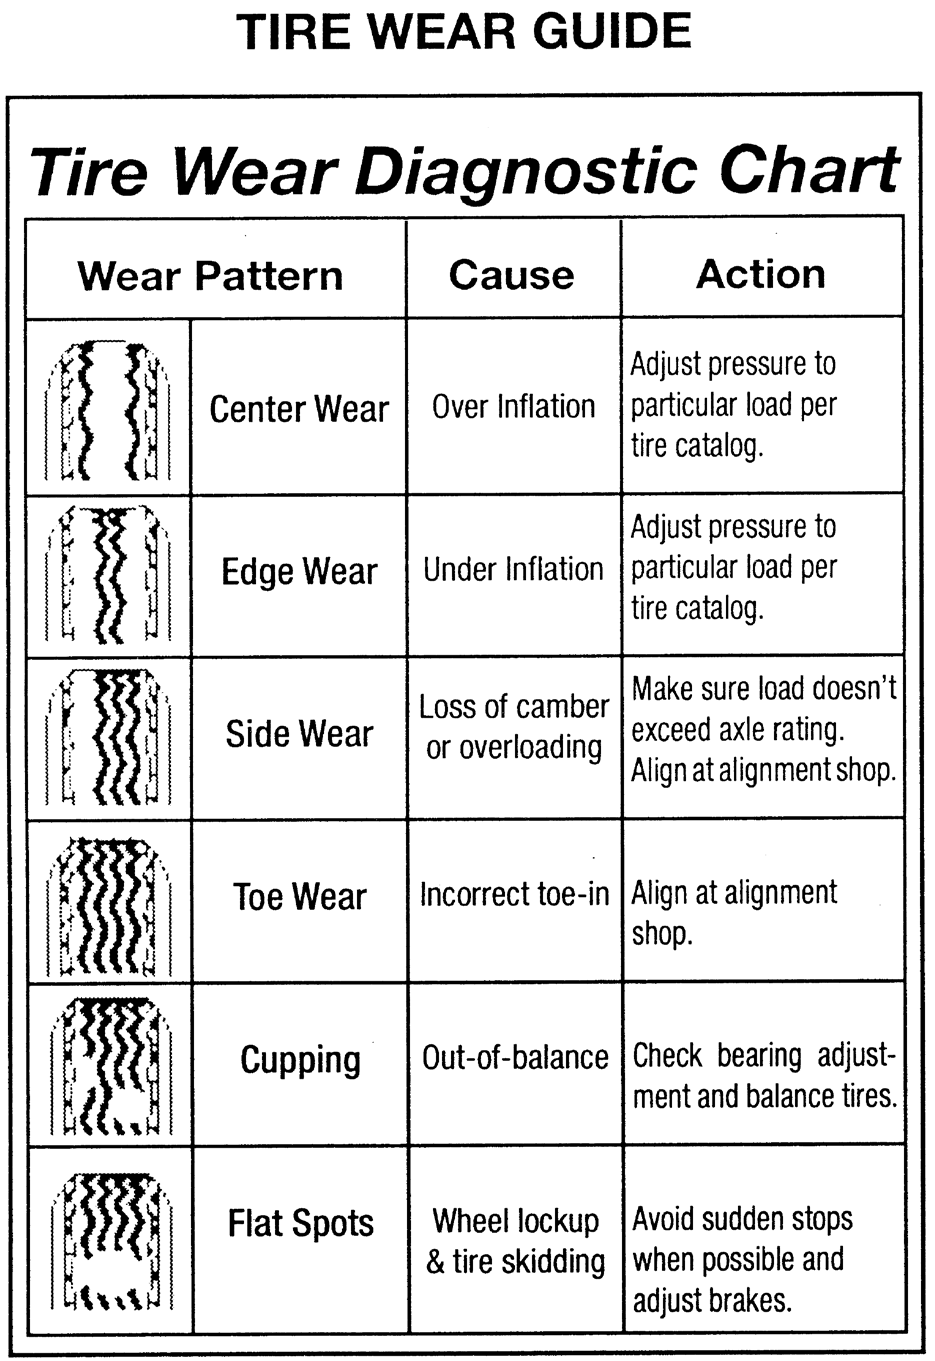
- Check Wear on Tires.
- Inspect Hubs for Missing Grease/Oil Caps or Leaks.
- Check Trailer Brakes for Proper Function.
- Check Breakaway – Battery Charge and Switch Operation.(If Applicable)
- Attach Breakaway Cable to Vehicle. (If Applicable)
Carrying Cargo – Before Towing
1. Make Sure Cargo Load Does Not Exceed Carrying Capacity or Gross Vehicle Weight Rating (GVWR) Designated for Trailer, Axles, and Tires – Stated on Certificate, Title and Labels.
2. Make Sure Trailer is Securely Attached to Towing Vehicle Before Loading/Unloading.When Using Ramps, Blocking Rear of Trailer May Be Necessary.
3. When Using Ramps, Blocking Rear of Trailer May Be Necessary.
4. Make Sure Cargo Weight is Properly Distributed.
5. Make Sure Cargo Load is Secure.
6. Make Sure Your Trailer is Towing in a Level Position. Unlevel Towing or Improper Load Distribution Can Cause Axle/Tire Overload, Which Can Cause Excessive Tire Wear, or Bending Axle.
7. Trailer Load on Hitch is Recommended at Approximately 10% – 15% of Total Weight.
NOTE: State and Local Brake Requirements May Vary From State to State.
SERVICING TRAILER
WARNING – Failure to Follow Safety and Service Procedures, or if You are Not A Trained or Certified Mechanic/Welder When Servicing Trailer, May Cause Serious Injury or Damage. It is Recommended to Have your Trailer Serviced and Maintenanced by a Qualified Mechanic/Welder.
Maintenance Schedule
3 Months or 3,000 Miles
1. Adjust Brakes. (See Brake Adjustments and Procedures)
2. Check Torque of Wheel Lug Nuts. (See Torque Requirements &Sequence)
3. Inspect Tires for Bulging, Cuts, Damage, and Wear.
4. Check Wheels For Cracks, Dents, and Damage.
5. Check Fluid Level in Master Cylinder Reservoir. (If Applicable)
6 Months or 6,000 Miles
- Check Brake Magnets for Wear and Current Draw. Do Not get Grease or Oil on Brake Magnets.
- Check Vehicle Brake Controller for Proper Modulation and Amperage. (see Brake Controller’s Manufacturer’s Manual for Recommendations and Troubleshooting)
- Inspect All Suspension Parts Such as – Springs, Equalizers, Bushings, Hangers, Axles, Bolts and Nuts, Etc., for Bending, Damage, Cracking, Looseness, and Excessive Wear.
- Inspect Tilt Cylinder(s) and all Lines, Hoses, and Seals for Leaks, Wear, and Damage.
For 10K – 15K Axles
5. Check Camshaft Bushings for Wear and Breakage.
6. Check Slack Adjuster for Lubrication.
7. Check Anchor Pins and Rollers for Lubrication.
12 Months or 12,000 Miles
- Check Brake Linings for Wear and Contamination. Replacement is Necessary if Lining is Worn to Within 1/6” or Less. Keep Clean From Grease, Oil and Dirt.
- Check Brake Disk, Pads, Etc. for Wear and Damage. (If Applicable)
- Check all Brake Springs and Hardware for Stretch or Wear.
- Check Brake Cylinders (hydraulic) for Fluid Leaks and Sticking.
- Check Brake Lines for Cracks, Leaks, and Kinks.
- Check Brake & Light Wiring for Bare Spots, Fraying, Etc.
- Check Hub/Drums for Excessive Wear or Scoring. Keep CleanFrom Grease, Oil and Dirt.
- Check Hub/Wheel Bearings and Races for Corrosion and Wear.
- Repack Wheel Bearings with Grease/Oil. (See Lubricants)
- Check Seals for Leakage. Replace if Removed.
- Check Axle Springs For Damage, Wear, and Loss of Arch.
- Inspect Hangers & Welds for Cracking and Wear.
- Grease Jacks, Hinges, and Bolt Grease Fittings.
FRAME AND STRUCTURE
- Inspect All Frame & Welds for – Signs of Bending, Cracking, and Damage Due to Stress and Wear. (Main Frame, Sub Frame, Tongue/ Neck and Crossmembers)
- Inspect All Trailer Parts Such as – Couplers/Pintles, Jacks, Fenders, Safety Chains, Axles, Wheels, Etc. , for Cracking, Damage, and Wear.
NOTE: Inspection of Hubs & Drums, Bearings, Races, Seals, Brake Parts, Etc., Requires Hub/Drum Removal.
CHECK/TIGHTEN LUG NUTS
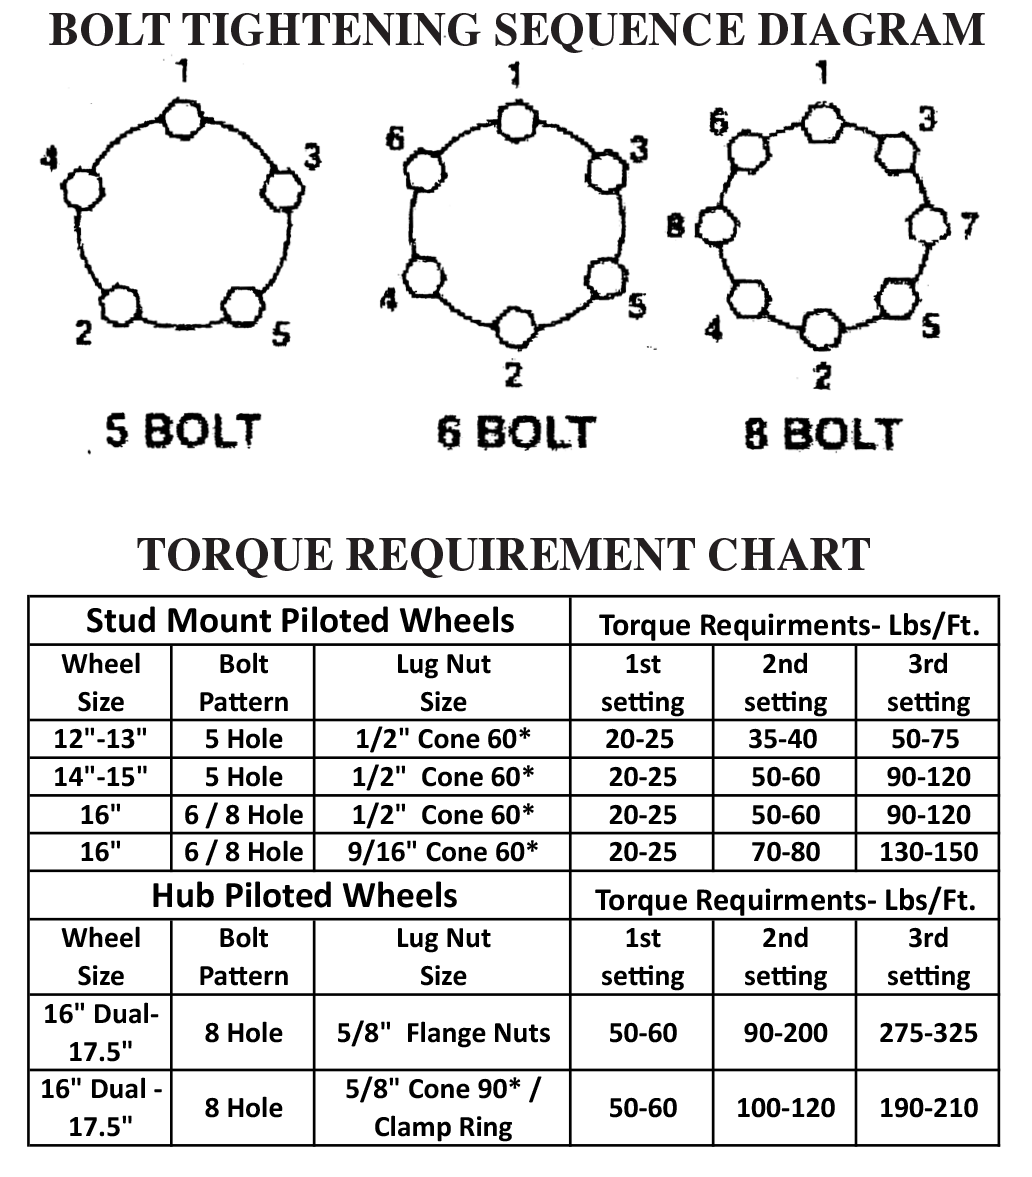
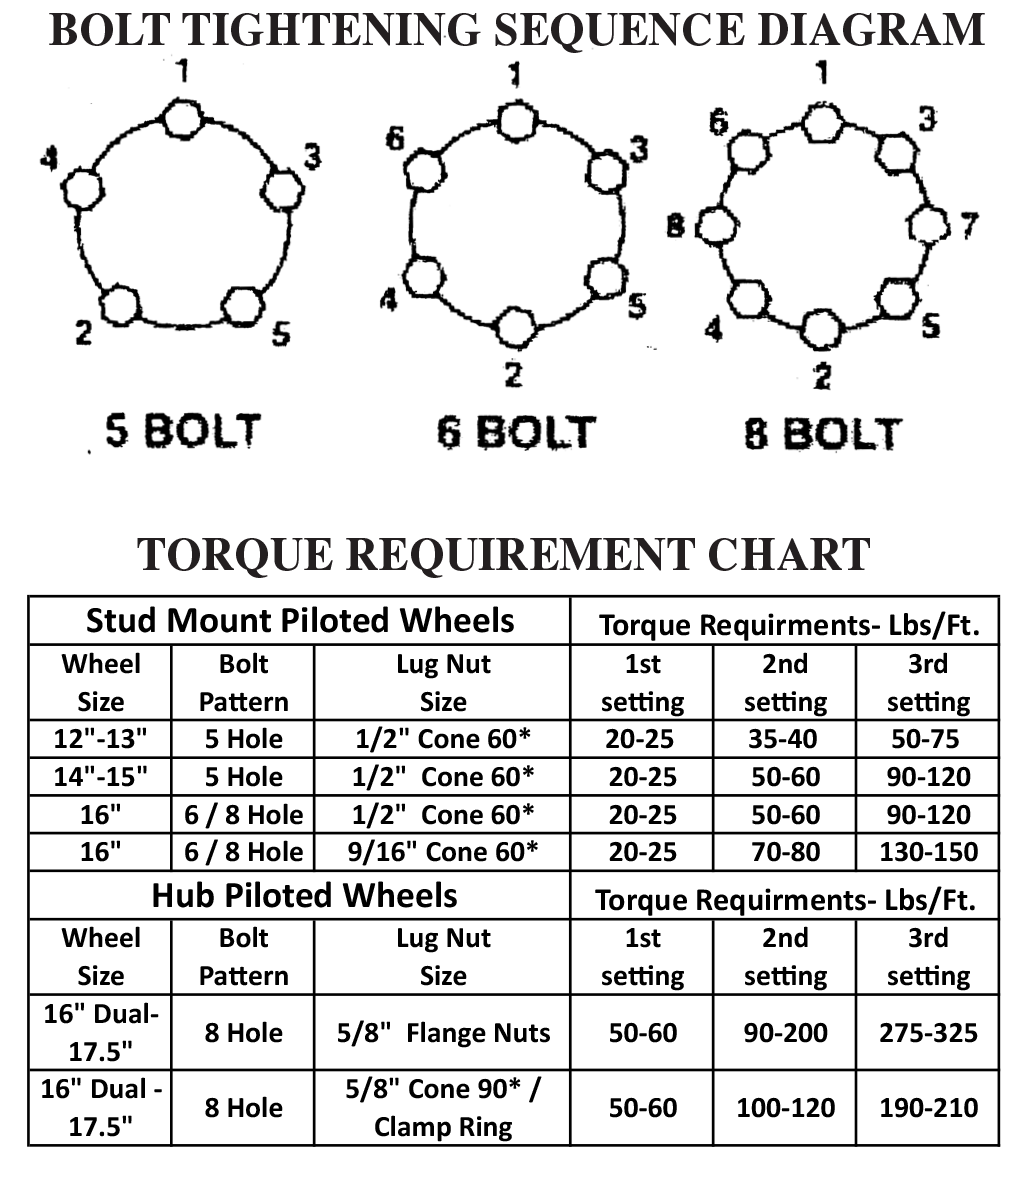
Torque Requirements
- Make Sure Mounting Surface of the Wheel and Axle Hub is Not Damaged and Clean From Dirt, Grease, Oil, Etc.
- Start all Lug Nuts by Hand to prevent Cross Threading.
- Tighten Lug Nuts Using A Torque Wrench Before the First Road Use and After Each Wheel Removal, Following the Sequence and Torque Setting as Shown Below in the Sequence Diagram and Torque Chart.
- Re-Torque Between the First 25-50 Miles, and Again At 100 Miles for8k-12kAxles.CheckPeriodicallyandDuringRegular Safety/Servicing Checks Thereafter.
- NOTE: Failure to Follow Torque Requirements May Result in Loose Wheels, Broken Lug Studs and Possible Wheel Separation From Axle Hub Causing Serious Damage.
LUBRICANTS AND BRAKE FLUIDS
1. Hub/Wheel Bearing Lubricants Recommended.
A. Grease Lubricated – High Quality NLGI 2 High Temperature Grease – Blue/Red.
B. Oil Lubricated – High Quality Non-Synthetic SAE 80-90 Wt. Gear Oil.
2. Hydraulic Surge Brakes & Actuator Fluid Recommended.
A. Drum & Disc Brakes – Heavy Duty DOT 3 or DOT 4 Brake Fluid.
3. Cushion/Gravity Cylinder(s), (Tilt Car Haulers) A. ATF Transmission Fluid or Equivalent
E-Z Lube Grease – Bearing Lubrication
- Remove the Rubber Plug from the End of The Grease Cap.
- Using a Manual Standard Grease Gun, Make Sure Grease Gun Nozzle is Fully Engaged on the Fitting.
- Slowly Pump Grease into the Fitting Until the Old Grease Begins to Flow Back out the Cap Around the Grease Gun and the New Clean Grease is Observed.
- MUST Rotate Hubs While Adding Grease.
- Replace the Rubber Plug in the Cap and Wipe Off Any Excess Grease.
Oil – Bearing Lubrication
- Periodically Fill Hub With Oil Through the Rubber Plug Hole in the Cap to the Level Indicated on the Clear Plastic Oil Cap.
- Oil is Recommended to be Replaced Every12 Months or 12,000 Miles.
- Inspect Oil Caps and Rings for Leaks, Replace if Necessary
BRAKEADJUSTMENT- DRUM&SHOES
SAFETY NOTICE
1. CAUTION – If Brakes are Not Properly Adjusted, or If You are Not a Trained or Certified Mechanic When Adjusting Brakes, May Cause Serious Damage or Injury. A Qualified Mechanic is Recommended When Adjusting Breaks.
2. Trailer Brakes Should be Adjusted Between 250 to 300 Miles After All of the Brake Components Have Seated. Re-Check Brake Adjustments at a Minimum of Every 3,000 Miles
3. All 10,000 lb. and 12,000 lb. Brakes are Self Adjusting. The Brakes Will Automatically Adjust as Needed Regardless of Direction of Travel. However, They Can be Manually Adjusted.For Brake Control Synchronization/Adjustment – Refer to Brake Controller Manufacturer’s Recommendations.
4. For Brake Control Synchronization/Adjustment – Refer to Brake Controller Manufacturer’s Recommendations.
5. CAUTION – Do Not Place Jack on Axle or Springs. Use Jack Stands to Secure Trailer.
6. BURNISHING – You Can Make Sure the Brakes Have
Been Properly Seated by Applying the Brakes Repeatedly
and Lightly for About 20 to 25 Times at A Low Speed (Under 25 MPH for Safety) to Begin the “Seating In” of the Brakes to the Brake Drum Components. Allow Ample Time for the Brakes to Cool Between Brake Applications.
BRAKE ADJUSTMENT PROCEDURE
- Make sure Your Trailer is on a Level Surface and is Free of any Potentially Dangerous Items.
- Jack up the Trailer and Secure with Jack Stands.
- Find the Adjustment Hole Cover and Remove it From the Backing Plate. Located at the Bottom Back of Backing Plate.
- Use a Brake Adjusting Tool to Adjust the Star Wheel (of
the Adjuster) and Expand the Brakes Until the Brake Shoes are Sufficiently Expanded so that the Tire and Wheel Will Not Easily Rotate. For Drop Axles, You May Need a Modified Brake Adjusting Tool. - Next Move the Star Wheel in the Opposite Direction Until You Can Feel A Little Resistance From the Brake and Replace the Hole Cover.
- Carefully Lower the Tire to the ground.
- Repeat this Procedure for all Wheels, Making Sure to Adjust All Brakes at the same Time.
- Test the Brakes to Make Sure They are Working Properly.
HYDRAULIC BRAKE BLEEDING
SAFETY NOTICE
1. CAUTION – If Hydraulic Brakes are Not Properly Bled and Adjusted, or if You are Not a Trained or Certified Mechanic, When Bleeding/Adjsting Brakes, May Cause Failure of Brakes, Which may Cause Serious Injury or Damage.
A Qualified Mechanic is Recommended If Brake Bleeding is Necessary.
2. NOTE – A Vacuum Brake Bleed Tool is Available in a Manual Hand Held or Air Pressure Operated For Hydraulic Brake Bleeding. However, Brakes can be Bled Manually From Most Actuators but Usually Requires an Assistant.
3. The Manual Pumping or Stroking Mechanism for Bleeding Can Vary According to the Model Actuator, And Sometimes Requires Loosening or Removing Bolts that Hold the Lever Guide and Emergency Lever Spring. Getting Instructions on Your Type of Actuator For Manual Bleeding of Brakes May be Necessary.
BLEEDING PROCEDURE
- Fill the Master Cylinder with Brake Fluid. (Dot 3 or 4 Brake Fluid)
- Make Sure ALL AIR BUBBLES ARE GONE out of the Master Cylinder Reservoir When Manually Pumping/Stroking or Using a Vacuum Brake Bleed Tool.
- Attach a Bleeder Hose to a Bleeder Valve on the Back of
- One of the Wheels Farthest From the Master Cylinder, and Submerge the Other End into a Transparent Container Partially Filled With Brake Fluid to Prevent Possible Splashing From the Container.
- Loosen the Bleeder Valve One Turn and While Watching Fluid in container, Pump the Fluid as Long as Bubbles Continue to Leave the Submerged Hose. When Air Bubbles Stop, Close the Bleeder Valve, and Move to the Next Wheel and Repeat the Same Procedure Until All Brakes Are Bled.Note: Refill Master Cylinder Fluid Level Often. (Every 4-5 Strokes and In between wheels)
- Make Sure Master Cylinder is Full and Securely Attach Cap.
If Necessary, Reinstall all Parts – the Emergency Lever Spring, Lever Guide, All Lock Washers and Bolts. For Demco Actuators, When Tightening the Bolts, Make Sure Lever Moves Freely in the Groove. - Check all Lines, Master Cylinder, Brakes and Valves for Any Leaks.
- Test the Brakes and Actuator to Make Sure They Are Working Properly, Brakes May Have to be Readjusted.
- Manufacturer’s Warranty
- Safety Procedures
- Servicing
- Torquing- Wheel Lugs & Suspension
- Lubricants
- Tire Wear
- Plug Wire Diagram
- Brake Adjustment
- Hydraulic Brake Bleeding
MANUFACTURER’S WARRANTY
- Buck Dandy Co., Inc. Warrants its’ Product to be Free of Defects for a Period of One (1) year from the Date of the Original Purchase.
- Warranty Covers – Defects in Materials, Frame and Workmanship. Frame Includes – Main Frame, Side Rails, Cross members, and Sub Frame only.
Warranty Limitations and Exclusions
- Components Not Manufactured by Buck Dandy Co., Inc. such
as – Axles, Brake Parts, Suspensions, Tires, Wheels, Couplers, Jacks, Etc., Are Warranted by Their Original Manufacturer, but Not Limited Exclusively to These Items. - Normal Wear – Items Not Warranted Due to Wear Include- Brakes, Bearings, Seals, Tires, Hoses, Paint Due to Chipping and Scarring, Lumber Due to Fading or Shrinking, or Parts due to Corrosion Etc., but Not limited Exclusively to These Items. These Items are Not Warranted.
- Modifications or Alterations Voids Manufacturer’s Warranty.
- Any Damage Caused by Overloading, Modifications, Alterations, Negligence, Accidents, Improper Loading, Misuse or Abuse such as- Bent Frames, Bent axles, Punched Tires, Bent/Damaged Hitch, Other Property; but Not Limited Exclusively to These Items, Is Not Covered Under Warranty.
- Damage Done Due to Lack of Proper Maintenance, Service and Safety Checks, Such as- Incorrect Air Pressure, Checking/Tightening Lug Nuts, Unfastened/Unsecured Couplers, Latches & Pins, Etc., is Not Covered Under Warranty.
- Transportation Cost of Trailer to Dealer or Repair Shop, Towing, Storage, Rental, Economic Loss, Loss of Time or Inconvenience, Etc. is Not Covered Under Warranty.
DISCLAIMERS
This Warranty is expressly in lieu of all other warranties and representations. Buck Dandy Co., Inc. makes no other representation or warranty of any kind, expressed or implied, with respect to Buck Dandy Co., Inc. No one, including an authorized Buck Dandy Co., Inc. representative is authorized to make further or additional warranties on behalf of Buck Dandy Co., Inc.
Warranty Claim Procedure
1. All Claims Must First be Handled Through the Dealer of Purchase.
2. Trailer Will Need to be Returned to Dealer (if at all Possible) for Inspection and Pictures as Soon as Possible.
3. Dealer May Submit Warranty Claim if Applicable.
4. All Warranties Must Be Pre-Notified and Agreed with Manufacturer.
TRAILER SAFETY PROCEDURES Before Towing – Every Use
- Check Hitch/Ball on Vehicle for Correct Size, Rating and Damage.
- Make Sure Hitch/Ball is Secure.
- Check Lubrication on Hitch/Ball.
- Inspect Coupler/Pintle for Damage, Cracks & Wear.
- Latch & Secure Coupler/Pintle.
- Check Master Cylinder/Actuator (Hydraulic Brakes) forLeaks & Damage. (If Applicable)
- Latch & Secure Safety Chains to Vehicle.
- Retract Jack(s).
- Secure All Bolts, Nuts, Latches and Pins: Coupler Pins/Bolts & Nuts, Ramp Pins, Gate Latches/Pins, Gate Bolts/Nuts, Tilt Pins, Etc.
- Check Signal, Brake and Running Lights.
- Check Lug Nuts. (See Torque Chart and Sequence)
- Check Air Pressure in Tires (PSI- located on Labels and Tires)
- Check Wear on Tires.
- Inspect Hubs for Missing Grease/Oil Caps or Leaks.
- Check Trailer Brakes for Proper Function.
- Check Breakaway – Battery Charge and Switch Operation.(If Applicable)
- Attach Breakaway Cable to Vehicle. (If Applicable)
Carrying Cargo – Before Towing
1. Make Sure Cargo Load Does Not Exceed Carrying Capacity or Gross Vehicle Weight Rating (GVWR) Designated for Trailer, Axles, and Tires – Stated on Certificate, Title and Labels.
2. Make Sure Trailer is Securely Attached to Towing Vehicle Before Loading/Unloading.When Using Ramps, Blocking Rear of Trailer May Be Necessary.
3. When Using Ramps, Blocking Rear of Trailer May Be Necessary.
4. Make Sure Cargo Weight is Properly Distributed.
5. Make Sure Cargo Load is Secure.
6. Make Sure Your Trailer is Towing in a Level Position. Unlevel Towing or Improper Load Distribution Can Cause Axle/Tire Overload, Which Can Cause Excessive Tire Wear, or Bending Axle.
7. Trailer Load on Hitch is Recommended at Approximately 10% – 15% of Total Weight.
NOTE: State and Local Brake Requirements May Vary From State to State.
SERVICING TRAILER
WARNING – Failure to Follow Safety and Service Procedures, or if You are Not A Trained or Certified Mechanic/Welder When Servicing Trailer, May Cause Serious Injury or Damage. It is Recommended to Have your Trailer Serviced and Maintenanced by a Qualified Mechanic/Welder.
Maintenance Schedule
3 Months or 3,000 Miles
1. Adjust Brakes. (See Brake Adjustments and Procedures)
2. Check Torque of Wheel Lug Nuts. (See Torque Requirements &Sequence)
3. Inspect Tires for Bulging, Cuts, Damage, and Wear.
4. Check Wheels For Cracks, Dents, and Damage.
5. Check Fluid Level in Master Cylinder Reservoir. (If Applicable)
6 Months or 6,000 Miles
- Check Brake Magnets for Wear and Current Draw. Do Not get Grease or Oil on Brake Magnets.
- Check Vehicle Brake Controller for Proper Modulation and Amperage. (see Brake Controller’s Manufacturer’s Manual for Recommendations and Troubleshooting)
- Inspect All Suspension Parts Such as – Springs, Equalizers, Bushings, Hangers, Axles, Bolts and Nuts, Etc., for Bending, Damage, Cracking, Looseness, and Excessive Wear.
- Inspect Tilt Cylinder(s) and all Lines, Hoses, and Seals for Leaks, Wear, and Damage.
For 10K – 15K Axles
5. Check Camshaft Bushings for Wear and Breakage.
6. Check Slack Adjuster for Lubrication.
7. Check Anchor Pins and Rollers for Lubrication.
12 Months or 12,000 Miles
- Check Brake Linings for Wear and Contamination. Replacement is Necessary if Lining is Worn to Within 1/6” or Less. Keep Clean From Grease, Oil and Dirt.
- Check Brake Disk, Pads, Etc. for Wear and Damage. (If Applicable)
- Check all Brake Springs and Hardware for Stretch or Wear.
- Check Brake Cylinders (hydraulic) for Fluid Leaks and Sticking.
- Check Brake Lines for Cracks, Leaks, and Kinks.
- Check Brake & Light Wiring for Bare Spots, Fraying, Etc.
- Check Hub/Drums for Excessive Wear or Scoring. Keep CleanFrom Grease, Oil and Dirt.
- Check Hub/Wheel Bearings and Races for Corrosion and Wear.
- Repack Wheel Bearings with Grease/Oil. (See Lubricants)
- Check Seals for Leakage. Replace if Removed.
- Check Axle Springs For Damage, Wear, and Loss of Arch.
- Inspect Hangers & Welds for Cracking and Wear.
- Grease Jacks, Hinges, and Bolt Grease Fittings.
FRAME AND STRUCTURE
- Inspect All Frame & Welds for – Signs of Bending, Cracking, and Damage Due to Stress and Wear. (Main Frame, Sub Frame, Tongue/ Neck and Crossmembers)
- Inspect All Trailer Parts Such as – Couplers/Pintles, Jacks, Fenders, Safety Chains, Axles, Wheels, Etc. , for Cracking, Damage, and Wear.
NOTE: Inspection of Hubs & Drums, Bearings, Races, Seals, Brake Parts, Etc., Requires Hub/Drum Removal.
CHECK/TIGHTEN LUG NUTS
Torque Requirements
- Make Sure Mounting Surface of the Wheel and Axle Hub is Not Damaged and Clean From Dirt, Grease, Oil, Etc.
- Start all Lug Nuts by Hand to prevent Cross Threading.
- Tighten Lug Nuts Using A Torque Wrench Before the First Road Use and After Each Wheel Removal, Following the Sequence and Torque Setting as Shown Below in the Sequence Diagram and Torque Chart.
- Re-Torque Between the First 25-50 Miles, and Again At 100 Miles for8k-12kAxles.CheckPeriodicallyandDuringRegular Safety/Servicing Checks Thereafter.
- NOTE: Failure to Follow Torque Requirements May Result in Loose Wheels, Broken Lug Studs and Possible Wheel Separation From Axle Hub Causing Serious Damage.
LUBRICANTS AND BRAKE FLUIDS
1. Hub/Wheel Bearing Lubricants Recommended.
A. Grease Lubricated – High Quality NLGI 2 High Temperature Grease – Blue/Red.
B. Oil Lubricated – High Quality Non-Synthetic SAE 80-90 Wt. Gear Oil.
2. Hydraulic Surge Brakes & Actuator Fluid Recommended.
A. Drum & Disc Brakes – Heavy Duty DOT 3 or DOT 4 Brake Fluid.
3. Cushion/Gravity Cylinder(s), (Tilt Car Haulers) A. ATF Transmission Fluid or Equivalent
E-Z Lube Grease – Bearing Lubrication
- Remove the Rubber Plug from the End of The Grease Cap.
- Using a Manual Standard Grease Gun, Make Sure Grease Gun Nozzle is Fully Engaged on the Fitting.
- Slowly Pump Grease into the Fitting Until the Old Grease Begins to Flow Back out the Cap Around the Grease Gun and the New Clean Grease is Observed.
- MUST Rotate Hubs While Adding Grease.
- Replace the Rubber Plug in the Cap and Wipe Off Any Excess Grease.
Oil – Bearing Lubrication
- Periodically Fill Hub With Oil Through the Rubber Plug Hole in the Cap to the Level Indicated on the Clear Plastic Oil Cap.
- Oil is Recommended to be Replaced Every12 Months or 12,000 Miles.
- Inspect Oil Caps and Rings for Leaks, Replace if Necessary
BRAKEADJUSTMENT- DRUM&SHOES
SAFETY NOTICE
1. CAUTION – If Brakes are Not Properly Adjusted, or If You are Not a Trained or Certified Mechanic When Adjusting Brakes, May Cause Serious Damage or Injury. A Qualified Mechanic is Recommended When Adjusting Breaks.
2. Trailer Brakes Should be Adjusted Between 250 to 300 Miles After All of the Brake Components Have Seated. Re-Check Brake Adjustments at a Minimum of Every 3,000 Miles
3. All 10,000 lb. and 12,000 lb. Brakes are Self Adjusting. The Brakes Will Automatically Adjust as Needed Regardless of Direction of Travel. However, They Can be Manually Adjusted.For Brake Control Synchronization/Adjustment – Refer to Brake Controller Manufacturer’s Recommendations.
4. For Brake Control Synchronization/Adjustment – Refer to Brake Controller Manufacturer’s Recommendations.
5. CAUTION – Do Not Place Jack on Axle or Springs. Use Jack Stands to Secure Trailer.
6. BURNISHING – You Can Make Sure the Brakes Have
Been Properly Seated by Applying the Brakes Repeatedly
and Lightly for About 20 to 25 Times at A Low Speed (Under 25 MPH for Safety) to Begin the “Seating In” of the Brakes to the Brake Drum Components. Allow Ample Time for the Brakes to Cool Between Brake Applications.
BRAKE ADJUSTMENT PROCEDURE
- Make sure Your Trailer is on a Level Surface and is Free of any Potentially Dangerous Items.
- Jack up the Trailer and Secure with Jack Stands.
- Find the Adjustment Hole Cover and Remove it From the Backing Plate. Located at the Bottom Back of Backing Plate.
- Use a Brake Adjusting Tool to Adjust the Star Wheel (of
the Adjuster) and Expand the Brakes Until the Brake Shoes are Sufficiently Expanded so that the Tire and Wheel Will Not Easily Rotate. For Drop Axles, You May Need a Modified Brake Adjusting Tool. - Next Move the Star Wheel in the Opposite Direction Until You Can Feel A Little Resistance From the Brake and Replace the Hole Cover.
- Carefully Lower the Tire to the ground.
- Repeat this Procedure for all Wheels, Making Sure to Adjust All Brakes at the same Time.
- Test the Brakes to Make Sure They are Working Properly.
HYDRAULIC BRAKE BLEEDING
SAFETY NOTICE
1. CAUTION – If Hydraulic Brakes are Not Properly Bled and Adjusted, or if You are Not a Trained or Certified Mechanic, When Bleeding/Adjsting Brakes, May Cause Failure of Brakes, Which may Cause Serious Injury or Damage.
A Qualified Mechanic is Recommended If Brake Bleeding is Necessary.
2. NOTE – A Vacuum Brake Bleed Tool is Available in a Manual Hand Held or Air Pressure Operated For Hydraulic Brake Bleeding. However, Brakes can be Bled Manually From Most Actuators but Usually Requires an Assistant.
3. The Manual Pumping or Stroking Mechanism for Bleeding Can Vary According to the Model Actuator, And Sometimes Requires Loosening or Removing Bolts that Hold the Lever Guide and Emergency Lever Spring. Getting Instructions on Your Type of Actuator For Manual Bleeding of Brakes May be Necessary.
BLEEDING PROCEDURE
- Fill the Master Cylinder with Brake Fluid. (Dot 3 or 4 Brake Fluid)
- Make Sure ALL AIR BUBBLES ARE GONE out of the Master Cylinder Reservoir When Manually Pumping/Stroking or Using a Vacuum Brake Bleed Tool.
- Attach a Bleeder Hose to a Bleeder Valve on the Back of
- One of the Wheels Farthest From the Master Cylinder, and Submerge the Other End into a Transparent Container Partially Filled With Brake Fluid to Prevent Possible Splashing From the Container.
- Loosen the Bleeder Valve One Turn and While Watching Fluid in container, Pump the Fluid as Long as Bubbles Continue to Leave the Submerged Hose. When Air Bubbles Stop, Close the Bleeder Valve, and Move to the Next Wheel and Repeat the Same Procedure Until All Brakes Are Bled.Note: Refill Master Cylinder Fluid Level Often. (Every 4-5 Strokes and In between wheels)
- Make Sure Master Cylinder is Full and Securely Attach Cap.
If Necessary, Reinstall all Parts – the Emergency Lever Spring, Lever Guide, All Lock Washers and Bolts. For Demco Actuators, When Tightening the Bolts, Make Sure Lever Moves Freely in the Groove. - Check all Lines, Master Cylinder, Brakes and Valves for Any Leaks.
- Test the Brakes and Actuator to Make Sure They Are Working Properly, Brakes May Have to be Readjusted.